Monday, March 22, 2010

Spring, lovely spring...


Hello friends,

Well, I'm still swamped with life right now, still working with public administrators and such, but I'm fine, my usual happy self. (thank you for the personal emails) I just have less time right now. While I have not had time to create in my art studio, I have been taking a few pictures, and enjoying this unusually warm March weather. I badly needed to relax this weekend, so I laid out in the sunshine (it was 75 all weekend!), got quite a tan too! I read several books, used the grill (grilled salmon on Saturday and grilled filet mignon on Sunday), did a bit of writing, and played in my flower beds a little. The trees are budding, and the hyacinths are up!
Above is a picture of one of them.

Can I just pause here, in total randomness and say: I WANT THIS KITCHEN in my beach house!!

Is it not full of awesome sauce?!

That retro fridge and stove, those light fixtures, that tile, the sea glass color with crisp white...LOVE, LOVE, LOVE. *SWOON!*

(picture from Coastal Living Magazine, on of my favorites)

In this spectacularly fun kitchen, I want to bake this:
(seriously, YES! So fantastic and yummy. From Doodle Bread)

I will make some time this week to work in my art studio and post whatever I create here for you. I apologize for being absent so long.
In the meantime, I hope this finds you well, being creative, and enjoying spring.

~Cheryl


Monday, March 15, 2010

Sorry I've been gone so long...


Hello Friends,

I apologize, but I've had a family emergency and also a death in the family. I'm the only living relative, and there was no will. I'm still trying to sort things out, assimilate.
I promise to get back in my scrap room SOON. (I really need the creative outlet and time to myself)
Thank you for your patience and may you have a lucky and happy St. Patrick's Day!
~Cheryl


Saturday, February 20, 2010

Fabric Flowers: fast easy and cheap! (My Unique Technique of the Week)


Hello Friends,

Happy Weekend! How are you? Is anyone out there?


Today I thought I'd show you how to make your own pretty fabric (or lace or ribbon) flowers, any size or color you want/need, for SO much less money than Prima and they'll be every bit as gorgeous. It's easy and fast. You can customize: add leaves (as I did with this particular one) or not. Add ribbon stems, or not. Add bead or pearl centers, or not.
NO SEWING.

Aside from using them on scrap pages and altered craft projects, you can add a pin backing to add them to your sweaters/clothing/jackets. Or add a hair pin backing and put them in your hair, or attach them to a head band, or bracelet.


(I don't know WHAT happened to this picture...some digi-glitch. Also, I took these pictures at night, so the lighting is awful; the flash creates shadows and overexposes everything. I apologize. Hopefully you can get the gist.)

You need only 3 things to make these flowers: Fabric Tac, felt (for backing), and fabric of choice.


I usually buy the fabrics from the remnant pile. (A lace is lovely too. I'll take some pictures of them tomorrow when I have better lighting.) I generally like a sheer, silky or satiny fabric, but sometimes I like a muslin or even a printed fabric. You can even use denim, velvet or linen... whatever you want. I have been known to cut up old clothes I no longer wear.

For the flower I made here, I used a sheer pink fabric that happens to have tiny sparkles on it (that don't really show up in my lousy photos).

First, Cut a Circle of Felt, the approximate size you wish your flower to be. (I usually use a white or cream color felt, especially when using light sheer fabric.) It doesn't have to be a perfect circle, it isn't going to show, and you can trim away any excess when you finish.


Then you are going to cut a couple of approx. 1" (ish) wide strips of your fabric.
Your strips don't have to be perfect or neat. (see photo below)

(After you play and make a couple you will find what you prefer. In general, the smaller flowers will use skinnier strips (1/2"-ish) and bigger flowers you may like a wider strip. Also, I usually use a thinner strip as my first piece (since it will be your center) and then the subsequent strips I usually cut a bit wider. But you don't have to. Really, the twist and wrap determines how big/tight your "petals" are. But more on that in a minute.)


Next you just tie a knot at one end of your first strip.


Then use your fabric tac and squirt a drop of glue to the center of your felt circle and press the knot of your fabric strip down on it.


(Your fingers are going to get a bit sticky, but it peels right off.)

Then simply squirt a bit more glue onto the felt, twist your fabric strip attach, twist, and attach going around your knot. You just keep twisting your fabric and glueing it down as you go around.
A smaller flower usually takes two-three strips (assuming about a foot and a half length strips), a big flower maybe 3-4 strips...again, depending on the length of strips you are using and the size of your flower.

When you are at the end of a strip in mid flower, just tuck it under and glue, and then tuck in a new strip and keep going. (no knot needed, just glue in a tucked end and start twisting and glueing.)

It goes very fast, and the glue dries very fast. I have made 4-5 big flowers in under 10 minutes. And they are ready to use when you're done...the glue dries fast.

*I usually like to twist tighter in the middle, and then make my twists looser as I get to the outer edges.
If there is any felt sticking out when you are done, just trim it away.

In this case, I used the same fabric tac glue and attached two CTMH felt leaves to the back.

That's all there is to it.
I hope you like it, and try it.

Cheryl


Friday, February 19, 2010

Don't forget, not even once, okay?


Find more videos like this on AdGabber

I thought this was very powerful...it made me cry.
It's a very good reminder.

I am working on plenty of art to share with you this weekend...some Unique Techniques!
In the meantime, please stay safe.
Hugs,
Cheryl
Sunday, February 14, 2010

Happy Valentines Day, and CraftRoom Love


Happy Valentines Day!
I hope you are having a lovely and loving day today.

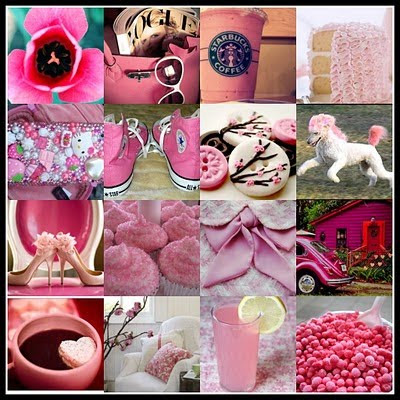
Please grab yourself a cup of something yummy like this (above)...or this (below), and spend a little time with me drooling over these delightful, yummy and oh-so-inspiring craft rooms.

Ready? Okay, let's ooh and ahhh...
and be inspired.

This first one, from BHG makes me weak in the knees. I swoon and sigh with love every time I look at it.
It's romantic and cozy, yes?


This one, well, I guess you can see I like a 'shabby chic' look, especially for a craft room...it's feminine, elegant, yet comfortable and not prissy or sterile...you can get it messy and inky and it's okay...part of the charm even.


This colorful gem, is my total, without a doubt FAVE, so smitten...love the pink and turquoise, love the vintage look...just LOVE LOVE LOVE!!
It is Heather Bailey's craft room, and her blog is yummy too!


This is a cleaner, more streamlined look from MakingMemories @ typepad


Here's a little collage of craft room goodness from Flickr:


How about this cute little closet/nook for your sewing spot?
Love the pretty fabrics out on display like this.

or this little closet sewing nook is nice too...


How about this storage cuteness? I love its vintage vibe and organizing ability for storing notions and such that these vintage suitcases provide, don't you?


Who doesn't love a french tiered wire basket for storing our goodies with style?


How about this magical way to store your glitter...
(though I would glitter up and cute-ify that tag a bit more...just sayin')


On this note, I shall poof out of here with my fairy wand and bid you a most magical Valentines evening.

What are YOUR favorite parts of your craftroom? What do you still want to do with yours?

xo ~Cheryl (all photo's/images are from Country Living except where noted)

Wednesday, February 10, 2010

Le Snowy Maison (part deux) and Mon Paris Ephemera Notebook


Bonsoir mon ami! How are you today?


Ca va bien, but please allow me to tell you what is happening here, in my little patch of the world:
Snowmageddon: The Sequel/the Knock Out Punch
or perhaps: Snowpocolypse: Death to All Snowblowers and Shovels... and Backs....
or: Dude Where's My Car/House? (duh, buried, never to be seen until the spring thaw)... or Dude, Where's the Plow Trucks?/Pain Reliever?

It's an adventure! We had almost 30" on Sat., another 8-9 inches last night, and a LOT today and calling for a foot more before midnight tonight! We've broken the all-time record in less than a week for the winter season snowfalls in recorded history in our area.

Of course this pleases the daughter greatly. (The worlds longest Presidents Weekend vacation.)

I bet you can guess some of what I will be doing while the blizzard rages outside (besides shoveling snow)??

Oui, le papier d'art!


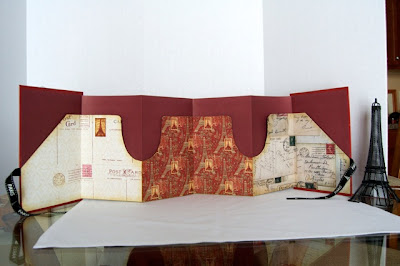
I will be going to Paris (w/ a side trip to Brussels, Belguim and Amsterdam) next year (!!!!!) and I made this to hold all the ephemera, tickets, and notes etc. while in Paris.
I'm not done with it yet, but I got a decent start on it, and I am pleased with how it turned out thus far.


Le Supply and Details/Semi-How-To Liste:

Le Cover:
~Two pieces of chipboard (mine happened to be 8 1/2 inches x 5 1/4", by Cosmo Cricket (old) & covered with red paper.)
Then I ripped a page from a very old (1880's) french-english dictionary (see photo below) that I bought for 25 cents at a library book sale. The paper was so fragile that when I ran the tape runner (tombow) glue over it, it ripped, so I had to run the glue on the red base, and then attach the page/paper down on to the cover.


The alpha's/PARIS title are glittered chipboard from several different sets: Heidi Swap, Making Memories, and K & Co..
Le Crown is STAMPED (stamp from CTMH 'YOU ROCK') heat embossed in silver, and cut out...and Stickles dotted on the jewels of the crown.
Le Key is Stamped (from CTMH 'Key to my Heart' Stamp Set) and heat embossed with mostly silver emb. powder, but sprinkled with a little black emb. powder to give it some patina and depth. Then I cut it out and then wrapped it a bit around a pencil to give it a round/dimensional/real quality.
Le Eiffel Tower and postage stamp are cut out from a vintage photograph, then I Stickled them a bit (w/silver), of course.
The innards:
~accordian fold (scored first) thick paper/CS and attach to chipboard cover (mine are scored and folded every 5". You will need to decide how many 'pages' you want, therefore determining the number of pieces of paper you will use here)
~Attach ribbon of choice for tie-closure. (I happend to have this Paris ribbon; I've been hanging on to it for years. I dont remember where it came from). Make sure you do this before you attach your folder front pieces, so you can hide where you attach your ribbon.
~make template for Pockets and trace to make the 3 (three) 6-pocket sections (as in mine, but you could do less. I think however that more would get too flimsy) Mark and score where it bends before attaching, obviously. For mine, each panel/paper is 10" wide and scored at 5". You would adjust according to your chipboard cover dimensions. You don't have to shape the pockets the way I did, you could certainly simplify or change it.
~Pocket Papers:
the first panel, blank postcards by Making Memories (old, from Love Story line);
the middle section is Graphic 45 from the Transantlantique Collection, Paris Post paper;
the right panel is from Making Memories, Vintage Findings/postcard findings.

If you have any questions, please let me know.
Bonne nuit!
xo Cheryl

Sunday, February 7, 2010

There's Snow Time Like the Present...

Hello Friends!
This is what is happening outside my front door right this second...


...we received more than two feet of snow...


so we are all "digging out from under it.

Remember back in December how I made the Cupcake Box for my neighbor because he offered up his snowblower so generously?

Well, he did us that kindness yet again.

(we all have over one acre lots in our hood, our driveways are LONG...shoveling isnt an option when it is this deep and heavy, unless you have days and days and want a cardiac arrest. We have a plow for our John Deer rider mower, but something is wrong with Johnny...he wont start, and it isnt his battery...sigh. And it never snows this much, so we werent concerned and figured it would wait until mowing season. Murphy and his Laws decided to dump two (so far) record breaking snowfalls on us this season.)

Sooo...here is the card I made our neighbor (plus sweet treats, but I wont bore you with those):


The lighting is funky, but the "Thank You" sentiment is heat embossed in silver and looks great in person.

Products used:

CTMH wht. daisy CS and paper from ctmh Aspen paper pack.
Stickles and prizma glitter, en masse! and some mica snow around the edges
silver paint pen (sharpee)
CTMH dimensional elements snowflake chipboards, heat embossed with clear and prizma glitter
ctmh rhinestone
tree (from little yellow bicycle) is heat embosses with clear and prisma glitter

It was simple and easy, but it looks very pretty and VERY sparkly in person.

More pix of more projects I worked on during the storm coming soon!

Go SAINTS!!
~Cheryl

Thursday, February 4, 2010

My Think Pink Challenge Projects


Hello Friends,

I am SO sorry I abandoned you like that! Remember those errands? Well one thing led to another, and then it was off to dance lessons of which we don't get home from until 10 pm...and the time flew by without me having one minute to play until this afternoon.

Today I finally had an hour or so to play in my (MESSY!) studio...I made one 12x12 LO, and one card for my This Weeks Inspiration Challenge. Here is some more lovely pink inspiration (from Flickr):


I went with a Valentine theme, because, duh, it justified eating valentine candy!
And worked within the Inspiration Challenge for this week (see information in previous post).

(full disclosure: I ate 4 heart-shaped York peppermint patties, yummy; and 3 kinda yucky sweeties conversational hearts, while crafting)

Both projects were quick and easy. I just did my usual plan-less, wingin'-it job, but I kept it simple. (re easy/fast)

*remember, you can click on the pix and see them big and in detail*

Here is my You Make My Heart Sing card:


And here is my 12"x12" LOVE LayOut (sans photos, as I am waiting for Valentines Day pix--obviously there will be 4, cropped to fit on the 4 squares):


Supplies/techniques:

Card:
CTMH CS~wht daisy, bubblegum
DoodleBug pink glittered CS
ctmh wht daisy ribbon
cuttlebug swiss dots emboss folder
scalloped scissors, and scalloped MS punch
Pink Stickles, and doodlebug chunky pink glitter
American Crafts glitter buttons
the Bird/You Make My Heart Sing little scrap is cut from a K&Co sheet

LOVE LO:
CTMH heart patterned paper (pp) from Animal Crackers paper pack; the red and pink dots are from the Jingle paper pack.
CTMH White Daisy textured CS and txtr die cuts (alpha and scalloped frame)
CTMH paper flowers (foam tape popped up, so the coming photos will fit easily under)
White flocked brad
*white satin Ribbon is REPURPOSED from some PJ's I bought at Target...they came folded with the ribbon around the pj's. So I saved it. I still have enough to make a few more bows too!

We are supposed to get hit by a LOT of SNOW this weekend, so I will try and get in some quality crafting time, and share it with all of you.

Have a wonderful evening,
~Cheryl

Tuesday, February 2, 2010

This Week's Inspiration Challenge...Happy Tuesday!


Oh Hello Gorgeous Friends,

How art (ART, get it?) thou? (I know, I know, my humor...FAIL)
I do hope you are doing well, happy.
Happy February. A month to celebrate love.


My love note to you:

My LOVE LETTER to YOU: THANK YOU!!! With only a few posts under my belt, and as a new blogger (and not tech savvy at all), I feel very honored and beyond grateful to have so many Visitors (from all over the world. It is so beautiful how blogging makes this planet small and neighborly) and lovely Followers. Really, you 'guys' are full of the awesome. Thank you...and much love.

Shall we talk about This Weeks Creative INSPIRATION Challenge? Yes? Okay!
Let's get to it.

THINK PINK!!


Okay... interpret as you wish, into whatever you wish.

**Click on the small, lower collage to see it bigger...for some reason I couldnt get it to post big.
I WANT THAT UMBRELLA...any suggestions?
AND, how awesome is that pink room with the script/writing on the walls?
I kinda wanna do it!!
(can I just tell you how much I love those pink heels...and the umbrella? Swoon! *sigh*)

I will post my interpretation later this evening.
First I need to grocery shop and other non-glam chores and errands.
I think I will buy some pink flowers at the grocery store for my studio.
Then I will hit my studio.
And create!

I hope you will play along with me, and share your creation(s) with us!
*Just post a link to your blog/creation in my comments section.

Please feel free to use the below Inspiration if your prefer (the lovely Tiffany ad)...
or do both!

See you soon,
Cheryl

Thursday, January 28, 2010

My Inspiration Challenge and Subsequent Creation


Oh Hello Creative Friends,

How are you this lovely winter's day?

I wanted to talk about Inspiration today.

I am inspired (at least hourly) by SO many things...

laughter
dreams
music
literature!
photographs
art
ballet
color
nature
adventures
people
travel
country farmers markets
vintage items/antiques, time worn with love
love and emotion
friends
animals
kindness
intelligence
books
words
language
poetry
museums
doors
(where do they go? who has walked through that one before? what's behind it?)
and, yes,
blogs, catalogs and magazines...

because there are SO many talented, creative people out there!

...the list could go on forever...inspiration is all around us.
There is so much beauty everywhere, even in the sad and painful things, moments and places.

I am inspired to write, read, give, do, feel, imagine, decorate, improve, wonder, create, dream...constantly.

Confession: I think I may be a Decorating Magazine Addict (among other things)

I LOVE decorating & gardening magazines, and cannot part with them!!
I have years worth of Country Living, Martha Stewart Living, Romantic Homes, BHG, Southern Living, Country Garden, Coastal Living, etc. etc., --stacks upon stacks, shelves upon shelves of them.
I adore them.
Even some catalogs I cant part with...Anthropologie catalogs are beyond dreamy and delicious!

(I cant be the only one...do YOU salivate and hoard magazines too?)

I decorate with books constantly...as part of the still life's around my home. Stacked on a table with a vase of flowers. So pretty.
(I'll post those pix another day)

I often use the magazines (and their ads) to inspire my decorating, but also in creating art.

Sooo, on that note...

I thought I'd do a Weekly PHOTO Creative Challenge...beginning today!

YOUR MISSION, should you choose to accept it, is:

interpret, any way you wish, the above Tiffany ad, into something creative.
Then share your creation with us by linking us in my comments section.
I will choose one each week to post here on my blog.

Here is my interpretation:


My friend's cousin passed away from cancer in his early 40's this week. It has hit the family hard. The viewing was yesterday, the funeral is today. I decided to make my friend this card.


Supplies ( I cant stop the underlining?? Sorry!):

CTMH txt. cardstock in Breeze and White
The wings: I just hand drew one and then traced it twice and cut it out. ( I dont have the right size winged stamp or chipboard, so I made do)
Then I painted it w/ pearl paint and then stickles.
Silver heat embossing for text.
I did a lot of sanding of the CTMH (white core)txt. cardstock.
Silver Sharpie paint pen borders the breeze blue CS.
I guess the rest is self explanatory.
I used some scraps ( you know I like to use up those scraps) of pretty paper by ROLLING them and glueing them down.

I hope you will play along with my Challenge!

Feel free to share it with friends...creativity and sharing is part of the fun.

Warmly,
Cheryl