 Greetings,
School was cancelled today, due to the massive snow storm we had over the weekend, so I didnt get done as much as I'd hoped.
The first thing I made was this card. I wanted to make a vintage/shabby chic/romantic looking card. Hopefully that is what I accomplished.
*You can click on the pictures to see the details ( since my photography skills kinda stink), but the products used are all CTMH ( except the lace ribbon, whihc I have had laying around forever).
The stamped snowflake ( stamp set: New Fallen Snow) is heat embossed. I "ink" the stamp first in VersaMark then in Dessert Sand and stamped onto Vanilla Cream CS. Then I sprinkled it with detail clear embossing powder and prizma glitter (mixed) and heat set it. Then I added pearls. (love them...and yeah, I went a little pearl crazy on this card) I matted that on top of white CS and glittered around it.
The other snowflake is from 2 punches, and I glittered, inked and layerd them, and added a pearl.
I used Blush CS and PP ( patterned paper) from That's Amore; and the other stamp set used was Snow Flurries ( just the end of one of thesnow 'swooshes', if you dont mind technical terms)...I think that's all the deets on the card. Pretty simple.
Okay, this next project was indeed a project. Here's the story: We dont have a snowblower. Our neighborhood/developement has minimum one acre lots (most far larger)...so we all have LONG driveways. But, we rarely get any real snow, so we just shovel or I hire one of the people that come thru our little 'hood to plow it. Well, we got over 25 inches (record breaking...of ALL TIME on record!). Needless to say, we didnt have street plowers through, let alone small business guys to do my driveway...and there was NO shoveling our driveway...a fleet couldnt have done it. (I'll post picture sometime this week). Anywho, a neighbor we rarely see pushed his blower down and started blowing our driveway. We did replace the gas (have some for the rider mower always ready) but wasnt that so sweet of our neighbor (that I dont really know)? I know, it really was. So, I made muffins at the kid's request today, and a snowy thank you card for the neighbor (I didnt take photos of it...sorry)...but wanted a cute way to take a muffin to the kind neighbor. Somewhere, a long time ago, either on the art boards, or splitcoast, I remember seeing a cupcake box made from CS. I searched the net, and either I had to pay, or it wasnt what I envisioned/remembered seeing. ( maybe it was a dream?)
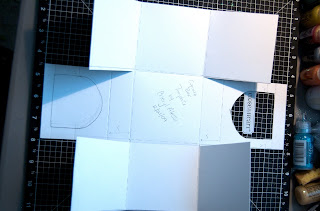
So, I embarked upon a cupcake box creating journey. It took a couple trial and errors...and I must tell you now, I would use heavier CS than ctmh's...ctmh's is too thin for this project. (though it is what you will see here) I have never attempted to make my own template or tutorial , so none of this will probably make sense...but I tried, just for you, to make it so that you could recreate it, if you wanted to. Lastly, in my defense, it took me a while to figure this out (I had nothing to copy or go by, just an old memory picture in my head....and a need)...so this isnt perfect, nor is it fancy. I will later make some dolled up fancified versions that re floating around in my pea brain. To make my template work, you will have to do some jimmy-jammin' and playing w/ it yourself, since I didnt have time to do a good job. ( I needed to make it and deliver it to the neighbors)
So, without further ado, may I present my cupcake box and (lame) template. (*click pix to see details and dimensions)


 The cover/lid startes with an 81/2 square piece of paper ( I would use CS next time, or heavier paper...it was flimsy but fit perfect...I was so proud of myself!) then scored at 2 1/2 inches in (the 2 1/2" mark and the 6" mark) Then score all around...only cut one slit per side. If that doesnt make sense, let me know.
 When it is all folded up, the top comes out 3 1/2' square, just as the box is.


I just free-handed the "muffin/cupcake" top and the "baking cup" bottom. ( I used the stripe from Jingle, and blush CS) The sentiment is from Cupcake sprinkles. (heat embossed w/ clear and prizma glitter over blush ink) and more prizma glitter (natch). Okay, that's all for today. :o)
I can picture doing "gift" looking boxes with holiday or bday cupcakes inside, and a bow on top. This is with plain white CS, cuz I was playing with it to create a template. I didnt want to use any fancy stuff yet while I experimented. I know this can be improved upon, but that's another day. (unless any of you come up with or have something better. I'm open to suggestions :)
Okay, I'm very tired and tired of looking at this project. (sorry if there are a lot of typos) So I bid you all a good night, and a good night to all.
Glittery holiday hugs,
Cheryl


beautiful box and I am so impressed with the muffin. Looks like a bakery muffin. I hope you got to enjoy the snow. I miss it being in Florida.
ReplyDeleteGorgeous card! The colors are stunning.
ReplyDeleteAww, thanks kind ladies.
ReplyDeleteMerry Christmas/Happy Holidays!
Hugs,
Cheryl
wow! your card is amazing! truly amazing!
ReplyDeleteOh la la- I lurve your work!!!
ReplyDeleteThanks Bren...I lurve yours too!!
ReplyDeleteYULEtide Greetings and Hugs,
Cheryl
What a wonderful tutorial - I have a cupcake box pattern but it requires the circle cutter that we no longer sell - so I don't have a way to make the circles any more! Your box is wonderful - my NEW method! Thank you so much!
ReplyDeleteLOVE your blog, by the way!
Thanks Sharli for your kind words and positive feedback. I sincerely appreciate it.
ReplyDeleteAs for the circle part to sink the muffin/cupcake, I used scissors to cut it out, and I created the round part by tracing half way around a cup. I'm very high tech. ;o)
LOVE, LOVE, LOVE your work... I can't wait to make a cupcake box! Thanks for sharing!
ReplyDeleteThank you Laura.:o)
ReplyDeletePlease share your cupcake box with us when you make it. I'd love to see what you come up with. My design certainly leaves plenty of room for improvement.
Incidentally, I like EATING the cupcakes more than putting them in boxes.
Hugs and gratitude,
Cheryl