Thursday, February 4, 2010

My Think Pink Challenge Projects


Hello Friends,

I am SO sorry I abandoned you like that! Remember those errands? Well one thing led to another, and then it was off to dance lessons of which we don't get home from until 10 pm...and the time flew by without me having one minute to play until this afternoon.

Today I finally had an hour or so to play in my (MESSY!) studio...I made one 12x12 LO, and one card for my This Weeks Inspiration Challenge. Here is some more lovely pink inspiration (from Flickr):


I went with a Valentine theme, because, duh, it justified eating valentine candy!
And worked within the Inspiration Challenge for this week (see information in previous post).

(full disclosure: I ate 4 heart-shaped York peppermint patties, yummy; and 3 kinda yucky sweeties conversational hearts, while crafting)

Both projects were quick and easy. I just did my usual plan-less, wingin'-it job, but I kept it simple. (re easy/fast)

*remember, you can click on the pix and see them big and in detail*

Here is my You Make My Heart Sing card:


And here is my 12"x12" LOVE LayOut (sans photos, as I am waiting for Valentines Day pix--obviously there will be 4, cropped to fit on the 4 squares):


Supplies/techniques:

Card:
CTMH CS~wht daisy, bubblegum
DoodleBug pink glittered CS
ctmh wht daisy ribbon
cuttlebug swiss dots emboss folder
scalloped scissors, and scalloped MS punch
Pink Stickles, and doodlebug chunky pink glitter
American Crafts glitter buttons
the Bird/You Make My Heart Sing little scrap is cut from a K&Co sheet

LOVE LO:
CTMH heart patterned paper (pp) from Animal Crackers paper pack; the red and pink dots are from the Jingle paper pack.
CTMH White Daisy textured CS and txtr die cuts (alpha and scalloped frame)
CTMH paper flowers (foam tape popped up, so the coming photos will fit easily under)
White flocked brad
*white satin Ribbon is REPURPOSED from some PJ's I bought at Target...they came folded with the ribbon around the pj's. So I saved it. I still have enough to make a few more bows too!

We are supposed to get hit by a LOT of SNOW this weekend, so I will try and get in some quality crafting time, and share it with all of you.

Have a wonderful evening,
~Cheryl

Tuesday, February 2, 2010

This Week's Inspiration Challenge...Happy Tuesday!


Oh Hello Gorgeous Friends,

How art (ART, get it?) thou? (I know, I know, my humor...FAIL)
I do hope you are doing well, happy.
Happy February. A month to celebrate love.


My love note to you:

My LOVE LETTER to YOU: THANK YOU!!! With only a few posts under my belt, and as a new blogger (and not tech savvy at all), I feel very honored and beyond grateful to have so many Visitors (from all over the world. It is so beautiful how blogging makes this planet small and neighborly) and lovely Followers. Really, you 'guys' are full of the awesome. Thank you...and much love.

Shall we talk about This Weeks Creative INSPIRATION Challenge? Yes? Okay!
Let's get to it.

THINK PINK!!


Okay... interpret as you wish, into whatever you wish.

**Click on the small, lower collage to see it bigger...for some reason I couldnt get it to post big.
I WANT THAT UMBRELLA...any suggestions?
AND, how awesome is that pink room with the script/writing on the walls?
I kinda wanna do it!!
(can I just tell you how much I love those pink heels...and the umbrella? Swoon! *sigh*)

I will post my interpretation later this evening.
First I need to grocery shop and other non-glam chores and errands.
I think I will buy some pink flowers at the grocery store for my studio.
Then I will hit my studio.
And create!

I hope you will play along with me, and share your creation(s) with us!
*Just post a link to your blog/creation in my comments section.

Please feel free to use the below Inspiration if your prefer (the lovely Tiffany ad)...
or do both!

See you soon,
Cheryl

Thursday, January 28, 2010

My Inspiration Challenge and Subsequent Creation


Oh Hello Creative Friends,

How are you this lovely winter's day?

I wanted to talk about Inspiration today.

I am inspired (at least hourly) by SO many things...

laughter
dreams
music
literature!
photographs
art
ballet
color
nature
adventures
people
travel
country farmers markets
vintage items/antiques, time worn with love
love and emotion
friends
animals
kindness
intelligence
books
words
language
poetry
museums
doors
(where do they go? who has walked through that one before? what's behind it?)
and, yes,
blogs, catalogs and magazines...

because there are SO many talented, creative people out there!

...the list could go on forever...inspiration is all around us.
There is so much beauty everywhere, even in the sad and painful things, moments and places.

I am inspired to write, read, give, do, feel, imagine, decorate, improve, wonder, create, dream...constantly.

Confession: I think I may be a Decorating Magazine Addict (among other things)

I LOVE decorating & gardening magazines, and cannot part with them!!
I have years worth of Country Living, Martha Stewart Living, Romantic Homes, BHG, Southern Living, Country Garden, Coastal Living, etc. etc., --stacks upon stacks, shelves upon shelves of them.
I adore them.
Even some catalogs I cant part with...Anthropologie catalogs are beyond dreamy and delicious!

(I cant be the only one...do YOU salivate and hoard magazines too?)

I decorate with books constantly...as part of the still life's around my home. Stacked on a table with a vase of flowers. So pretty.
(I'll post those pix another day)

I often use the magazines (and their ads) to inspire my decorating, but also in creating art.

Sooo, on that note...

I thought I'd do a Weekly PHOTO Creative Challenge...beginning today!

YOUR MISSION, should you choose to accept it, is:

interpret, any way you wish, the above Tiffany ad, into something creative.
Then share your creation with us by linking us in my comments section.
I will choose one each week to post here on my blog.

Here is my interpretation:


My friend's cousin passed away from cancer in his early 40's this week. It has hit the family hard. The viewing was yesterday, the funeral is today. I decided to make my friend this card.


Supplies ( I cant stop the underlining?? Sorry!):

CTMH txt. cardstock in Breeze and White
The wings: I just hand drew one and then traced it twice and cut it out. ( I dont have the right size winged stamp or chipboard, so I made do)
Then I painted it w/ pearl paint and then stickles.
Silver heat embossing for text.
I did a lot of sanding of the CTMH (white core)txt. cardstock.
Silver Sharpie paint pen borders the breeze blue CS.
I guess the rest is self explanatory.
I used some scraps ( you know I like to use up those scraps) of pretty paper by ROLLING them and glueing them down.

I hope you will play along with my Challenge!

Feel free to share it with friends...creativity and sharing is part of the fun.

Warmly,
Cheryl

Monday, January 25, 2010

Puppy Love (the furry love of my life) and Wishing I was at CHA


Hello lovely friends,

I'm working on a scrap LO using Brand New papers from CHA, and my sweet puppy (she is 6 years old, so not exactly a puppy anymore, but doesnt she still look as cute as any puppy? ) is always laying at my feet while I work. I just had to show you who really rules this house. (Please forgive me for boring you with non-artwork cuteness. *blush*)

To make this post artwork related: Have you seen the new Tim Holtz stuff?? OMGoodness!! And Tattered Angels/Heidi Swap?? And Websters? And Basic Grey?? MM?? I am gonna be poor, poor po!

The Product coming out of CHA is sickeningly full of the AWESOME!! Poor I say. Ramen noodles for the rest of my life, so I can get me some goodies.. (Bren, you're still there, right? Are you taking pix for us? I Lurve the booth displays! hint hint.)

My Wish List is LONG. L-O-N-G!

What's on YOUR list?

xo Cheryl

Sunday, January 24, 2010

More Copic Tips and a Cute Card with layers

Hello Sweet Friends!

How are you today?

It is still raining here, as you can tell by my dark pictures.

Anyway, I thought I would do a little Copic Tutorial(ish) especially for those of you that are still very newish to using them.
There are a lot of AWESOME video tutorials on YouTube, just search for copics. And there are far better, more talented copic artists out there than me! ( so please go view them, and note what I am about to share are just my personal tastes and what works for me)
But, even after I direct people to YouTube and other places, I frequently get direct emails asking many of the same questions, so I thought I would go ahead and give my two cents/thoughts/tips. I have been using them for a couple of years and mostly learned by trial and error.

*Note: I purposefully did not blend well on this card, to show WHERE I place my shading colors. Hence the horrid lack of blending on the green laundry, her face, etc. (you can scroll down and find my Anya card, my Gorgjuss Girl/Oooh la la, etc. to see well blended coloring)
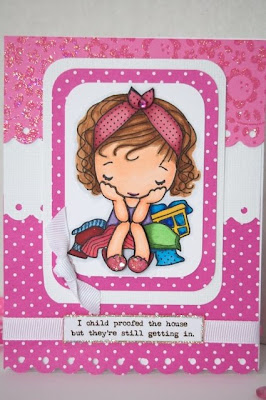
Okey dokey...First, let's discuss the stamping. You will need a non-bleeding ink pad for the stamping. I use Memento Tuxedo Black. I have tried many ink pads, and this bleeds the least, IMHO. Still, be sure to let it dry VERY WELL before you start coloring.

Next, let's talk "starter colors", those markers you need when you are just starting out.
To a large degree this depends on what type of stamps you tend to color (* ie., people, flowers/landscapes, animals etc.).
I like to color anything and everything, so I have every Sketch marker, but I worked up to that. Even with owning every color, I still find myself using many of the same markers over and over. (I will list them below, but please read through this)

I use the brush tip more than 95% of the time.

For "people" (as shown here and elsewhere in my blog), you will need skin-tones and hair colors --these are markers I tend to use a LOT. Also, denim color markers for their pants. (I will make lists of numbers, dont worry)

For skin: Depending on whether she (or he...from here on out I will say 'she' meaning either gender) is tan (summertime people in bathing suits for example, or people of a darker skin tone), or if she is fair, will depend on which colors you will use.

My most frequently used skin tones (from light to dark) are:
EOOO (pale fruit pink); EOO (skin white); E02 (fruit pink) ...and for darker skin tones I like to add *E33 (sand) or *E34(Orientale)-- (*which I also use in brunette hair, shoes, and wood, and ground a lot!...E33 or E34 are well used markers for me...you only need one or the other, not both, since they are very close in number/color)-- for rosy cheeks I like R20 (blush)

I start with the lightest color and do the entire area. Then take your darker shade and do the "shading", where there would naturally be shadows (under the hairline, under the chin/neck, the folds of the arms and legs etc. (see girl above *hopefully you can click on the photos and see them up close/larger.) Then go back with the lighter shade (or middle shade if you use 3-4 colors, as I usually do. But this isnt neccessary...2 colors: a lighter and a darker is totally fine, and the best way to start) and blend the shading into the lighter area. You can keep going back over and over, darker and lighter, until you gt it just the way you like it. This is where practicing is crucial...and fun.

My most used colors for HAIR:

Brunette: E33 or e34 as my base, then E37 (sepia) , E09 (burnt sienna--especially for an auburn shade, also for auburn I like to add E08), and E47 (dark brown) (I have a dark brunette girl under titled post Oooh La la--one of my first posts)

Blondes/highlights (for highlighted blondes make it streakier/chunkier...my Anya in another post a couple weeks ago shows a streaky blonde): Y000 (pale lemon) as my base, then y21 (buttercup yellow) and E33 or E34 (yep, again, see this is a MUST HAVE color!)

Pitch black hair (and metals): (this can be the trickiest, so look for video tutorials on YT...and wait to get these markers unless you plan to color a lot of Asain hair, as they are really the only ones with BLACK hair--or if you plan to color a lot of wrought iron metal, or silver-ish stuff like galvanized metal looking watering cans etc. then these colors come in handy--an example of this is on my bird cage w/ veranda paper card below) (except you will want 110 Special Black, and the lightest grey, which I LOVE Co Cool Grey No. 0 --I use this to trace around my images as it makes them pop off the white CS, or for shadows) So, you will want the full range of greys, skipping every-ther number...I prefer the cools or nuetrals: start with the afore mentioned C0 or No, then the C or N 3, 5, 7 and then the Special Black. That will serve all your black hair needs and metals. But to start, just use the 0 and the black. Then later, add a middle, like a 3. Last, when you find you need them then add a 5 and 7.

Before I go into more colors I will also show you a tip I persoanlly love to do...it is awesome in person, and gets a big wow everytime. Stamp two images, and fully color your main image. Then figure out what layers you want to add for dimension, aka which parts are in front...and color them on the second image and cut them out. The foam tape them onto the first/main image. (see below and almost all my other cards using copics)

Here I cut out her arms and legs and the front of her slippers...and the knot/bow on her headband, and some laundry. Then I foam dotted them to the first image. In this case I used a bit of white tacky glue to press her hands back down to her face, so her forarms actually bend. It looks great IRL.
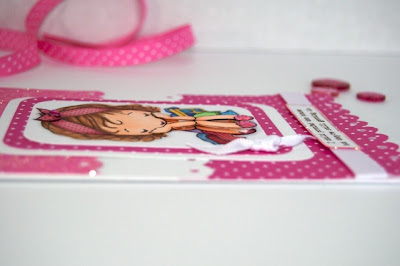

(You can also see below where I traced around her image with Cool Grey No. 0.)
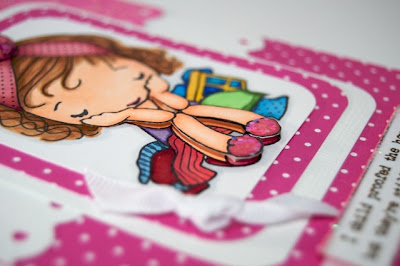


Here is the list of OTHER basic markers I use frequently ( aside from what I already listed):

BLUES/ Denim/blue eyes/sky/water (I use the copic airbrush system) in order of my most used:
B21 (baby blue); B97 Night Blue; B000 pale porcelan blue ( also good for tracing around images for a more sky shadow); B12 ice blue; BG01 aqua blue; B69 Stratosphere Blue

Browns/Wood/nature/animal fur etc, the browns used for brunette hair is plenty...esp. E34! (or E33)

Pinks--Reds Most used, in order: R20 (blush); R83 Rose mist; R85 Rose Red; R39 Garnet; R46 Strong Red

Yellows-Oranges: If you have the yellows I use for the blonde hair, you have an awesome start and just need to add a couple of the darker brighter colors ( for flowers, suns, etc): y08 acid yellow; y17 golden yellow and yr07 cadmuim orange will be plenty to start.

(*remember you can mix colors, like a yellow and a red to get an orange)

Greens ( important if you do a lot of flowers/landscapes/nature/trees): You could get by (to start) with just these two of my most used greens ( a light and a dark, whihc you can mix):
YG11 Mignonette ; YG67 moss; ...then fill in with: YG Grass green; G28 Ocean Green( I've never seen an ocean anywhere near this color, but whatever)...then later fill in more w/ G09 and G24

Purples ( really only for flowers and clothes, if you like purple, which I do): start with:a light
BV00 mauve shadow or a BV02 prune; then a middle like V17 amethyst; and a dark like BV08 blue violet.

A couple of red-violets I use a lot are: RV19 red violet; RV69 Peony--great for roses, along witht he previouslyu mentioned pinks/reds.

A couple of other things: the only time I really use the chisel end ( aside from the airbrushing) is when I do the trace around shadowing....and MOST of all when I use the Colorless Blender-see below. (again, this is just what works for me...you may do differently. And I am always open to suggestions/your tips)

The Colorless Blender -0-: This is a misunderstood, perhaps even misnamed , but VERY USEFUL marker. (watch the vidoes!) You do need this, but not to blend. I use it most frequently to "fix" my boo-boo's, when I get color outside the line. I prefer to call it a Color PUSHER. I use the chisel end to 'push" the erroneous color back where it belongs. I also use it as a color remover...to add dots or texture to a color.

Okay, that's it for now. I'm a slow typer, so this wiped me out.
I hope it helped. And I am happy to answer any questions.

Colorful Inky Hugs,
Cheryl

Friday, January 22, 2010

Copic Fun/ My Unique Technique of the Week

Hello Friends!
And...Happy Friday!!

How would you like an endless array of colored rhinestones; every color of the rainbow at your disposal?

Did you know that you can use your Copic Markers (or any ALCOHOL-based markers/ink...but most of us have Copic brand, though I know a few of you have the Prisma or Ranger alcohol markers) to color your clear rhinstones?
Yep. In less than a second you can turn any clear rhinestone into any color you wish.

Go from this....

...to This!


Isnt that awesome?! I know!
The brighter colors show up the best. ( sorry my pix are dark...again, it is raining, so I have no sunlight to help a girl out. I need a light box. Too bad Copics cant make me one of them!) Anyway, I use the brush tip end and just swipe it around the stone once and viola!


I only buy clear, and I can make them match any artwork I wish. So fun.

More artwork coming tomorrow.

**Please scroll down and do the Getting To Know You Questions...it's fun to get to know each other!

Inky Hugs,

Cheryl

Sunday, January 17, 2010

(Semi Complete) 'Time Flies'/Love 2 pg LO


Hello Friends,
How are you?
It is raining heavily here today, so I am spending time in my craft studio. (of course, the rain isnt helping the lighting of my photos...a girl cant get a break)
Here is my (almost finished) 2-page LO. I still have to tweak a few things I'm not happy with, and I need to take a new photo of my daughter. (the photo of her on page two is from several years ago)
Page One:


Page Two:The wings are made of vellum and painted with Pearl Paint, but you cant tell that by my lousy photos. Sorry. It's too dark because of the rain. And the words above the winged clock/heart say: Time Flies. I think you can click on the photos and see it larger.


Make it a wonderful weekend,
Cheryl