Showing posts with label copics. Show all posts

Sunday, January 24, 2010

More Copic Tips and a Cute Card with layers

Hello Sweet Friends!

How are you today?

It is still raining here, as you can tell by my dark pictures.

Anyway, I thought I would do a little Copic Tutorial(ish) especially for those of you that are still very newish to using them.
There are a lot of AWESOME video tutorials on YouTube, just search for copics. And there are far better, more talented copic artists out there than me! ( so please go view them, and note what I am about to share are just my personal tastes and what works for me)
But, even after I direct people to YouTube and other places, I frequently get direct emails asking many of the same questions, so I thought I would go ahead and give my two cents/thoughts/tips. I have been using them for a couple of years and mostly learned by trial and error.

*Note: I purposefully did not blend well on this card, to show WHERE I place my shading colors. Hence the horrid lack of blending on the green laundry, her face, etc. (you can scroll down and find my Anya card, my Gorgjuss Girl/Oooh la la, etc. to see well blended coloring)
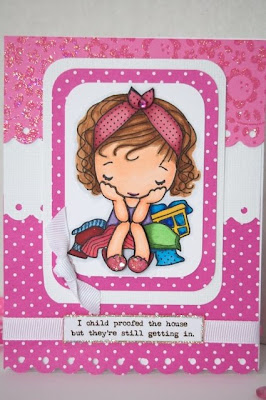
Okey dokey...First, let's discuss the stamping. You will need a non-bleeding ink pad for the stamping. I use Memento Tuxedo Black. I have tried many ink pads, and this bleeds the least, IMHO. Still, be sure to let it dry VERY WELL before you start coloring.

Next, let's talk "starter colors", those markers you need when you are just starting out.
To a large degree this depends on what type of stamps you tend to color (* ie., people, flowers/landscapes, animals etc.).
I like to color anything and everything, so I have every Sketch marker, but I worked up to that. Even with owning every color, I still find myself using many of the same markers over and over. (I will list them below, but please read through this)

I use the brush tip more than 95% of the time.

For "people" (as shown here and elsewhere in my blog), you will need skin-tones and hair colors --these are markers I tend to use a LOT. Also, denim color markers for their pants. (I will make lists of numbers, dont worry)

For skin: Depending on whether she (or he...from here on out I will say 'she' meaning either gender) is tan (summertime people in bathing suits for example, or people of a darker skin tone), or if she is fair, will depend on which colors you will use.

My most frequently used skin tones (from light to dark) are:
EOOO (pale fruit pink); EOO (skin white); E02 (fruit pink) ...and for darker skin tones I like to add *E33 (sand) or *E34(Orientale)-- (*which I also use in brunette hair, shoes, and wood, and ground a lot!...E33 or E34 are well used markers for me...you only need one or the other, not both, since they are very close in number/color)-- for rosy cheeks I like R20 (blush)

I start with the lightest color and do the entire area. Then take your darker shade and do the "shading", where there would naturally be shadows (under the hairline, under the chin/neck, the folds of the arms and legs etc. (see girl above *hopefully you can click on the photos and see them up close/larger.) Then go back with the lighter shade (or middle shade if you use 3-4 colors, as I usually do. But this isnt neccessary...2 colors: a lighter and a darker is totally fine, and the best way to start) and blend the shading into the lighter area. You can keep going back over and over, darker and lighter, until you gt it just the way you like it. This is where practicing is crucial...and fun.

My most used colors for HAIR:

Brunette: E33 or e34 as my base, then E37 (sepia) , E09 (burnt sienna--especially for an auburn shade, also for auburn I like to add E08), and E47 (dark brown) (I have a dark brunette girl under titled post Oooh La la--one of my first posts)

Blondes/highlights (for highlighted blondes make it streakier/chunkier...my Anya in another post a couple weeks ago shows a streaky blonde): Y000 (pale lemon) as my base, then y21 (buttercup yellow) and E33 or E34 (yep, again, see this is a MUST HAVE color!)

Pitch black hair (and metals): (this can be the trickiest, so look for video tutorials on YT...and wait to get these markers unless you plan to color a lot of Asain hair, as they are really the only ones with BLACK hair--or if you plan to color a lot of wrought iron metal, or silver-ish stuff like galvanized metal looking watering cans etc. then these colors come in handy--an example of this is on my bird cage w/ veranda paper card below) (except you will want 110 Special Black, and the lightest grey, which I LOVE Co Cool Grey No. 0 --I use this to trace around my images as it makes them pop off the white CS, or for shadows) So, you will want the full range of greys, skipping every-ther number...I prefer the cools or nuetrals: start with the afore mentioned C0 or No, then the C or N 3, 5, 7 and then the Special Black. That will serve all your black hair needs and metals. But to start, just use the 0 and the black. Then later, add a middle, like a 3. Last, when you find you need them then add a 5 and 7.

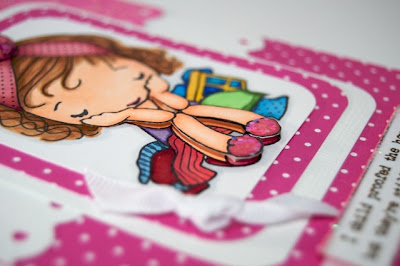
Before I go into more colors I will also show you a tip I persoanlly love to do...it is awesome in person, and gets a big wow everytime. Stamp two images, and fully color your main image. Then figure out what layers you want to add for dimension, aka which parts are in front...and color them on the second image and cut them out. The foam tape them onto the first/main image. (see below and almost all my other cards using copics)

Here I cut out her arms and legs and the front of her slippers...and the knot/bow on her headband, and some laundry. Then I foam dotted them to the first image. In this case I used a bit of white tacky glue to press her hands back down to her face, so her forarms actually bend. It looks great IRL.
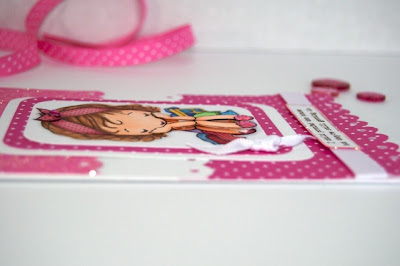

(You can also see below where I traced around her image with Cool Grey No. 0.)


Here is the list of OTHER basic markers I use frequently ( aside from what I already listed):

BLUES/ Denim/blue eyes/sky/water (I use the copic airbrush system) in order of my most used:
B21 (baby blue); B97 Night Blue; B000 pale porcelan blue ( also good for tracing around images for a more sky shadow); B12 ice blue; BG01 aqua blue; B69 Stratosphere Blue

Browns/Wood/nature/animal fur etc, the browns used for brunette hair is plenty...esp. E34! (or E33)

Pinks--Reds Most used, in order: R20 (blush); R83 Rose mist; R85 Rose Red; R39 Garnet; R46 Strong Red

Yellows-Oranges: If you have the yellows I use for the blonde hair, you have an awesome start and just need to add a couple of the darker brighter colors ( for flowers, suns, etc): y08 acid yellow; y17 golden yellow and yr07 cadmuim orange will be plenty to start.

(*remember you can mix colors, like a yellow and a red to get an orange)

Greens ( important if you do a lot of flowers/landscapes/nature/trees): You could get by (to start) with just these two of my most used greens ( a light and a dark, whihc you can mix):
YG11 Mignonette ; YG67 moss; ...then fill in with: YG Grass green; G28 Ocean Green( I've never seen an ocean anywhere near this color, but whatever)...then later fill in more w/ G09 and G24

Purples ( really only for flowers and clothes, if you like purple, which I do): start with:a light
BV00 mauve shadow or a BV02 prune; then a middle like V17 amethyst; and a dark like BV08 blue violet.

A couple of red-violets I use a lot are: RV19 red violet; RV69 Peony--great for roses, along witht he previouslyu mentioned pinks/reds.

A couple of other things: the only time I really use the chisel end ( aside from the airbrushing) is when I do the trace around shadowing....and MOST of all when I use the Colorless Blender-see below. (again, this is just what works for me...you may do differently. And I am always open to suggestions/your tips)

The Colorless Blender -0-: This is a misunderstood, perhaps even misnamed , but VERY USEFUL marker. (watch the vidoes!) You do need this, but not to blend. I use it most frequently to "fix" my boo-boo's, when I get color outside the line. I prefer to call it a Color PUSHER. I use the chisel end to 'push" the erroneous color back where it belongs. I also use it as a color remover...to add dots or texture to a color.

Okay, that's it for now. I'm a slow typer, so this wiped me out.
I hope it helped. And I am happy to answer any questions.

Colorful Inky Hugs,
Cheryl

Friday, January 22, 2010

Copic Fun/ My Unique Technique of the Week

Hello Friends!
And...Happy Friday!!

How would you like an endless array of colored rhinestones; every color of the rainbow at your disposal?

Did you know that you can use your Copic Markers (or any ALCOHOL-based markers/ink...but most of us have Copic brand, though I know a few of you have the Prisma or Ranger alcohol markers) to color your clear rhinstones?
Yep. In less than a second you can turn any clear rhinestone into any color you wish.

Go from this....

...to This!


Isnt that awesome?! I know!
The brighter colors show up the best. ( sorry my pix are dark...again, it is raining, so I have no sunlight to help a girl out. I need a light box. Too bad Copics cant make me one of them!) Anyway, I use the brush tip end and just swipe it around the stone once and viola!


I only buy clear, and I can make them match any artwork I wish. So fun.

More artwork coming tomorrow.

**Please scroll down and do the Getting To Know You Questions...it's fun to get to know each other!

Inky Hugs,

Cheryl

Friday, January 8, 2010

Love is in the Air...


Hello Friends,

Happy Friday!! I heart Fridays!! And, I heart YOU!
Today my theme is love. And isnt that a wonderful theme? I have 3 cards to share with you today using copic markers, heat embossing, stamping....and even using up those scraps.

I hope you will spend some time visiting me, I truly love having company, especially lovely artistic, crafty friends like you.


Okay, Card no. 1~ I Heart You is a straight-up lift from the new Feb. Scrapbooks Etc. mag--I didnt do one thing different...except theirs is better. My pink flower and pink background paper is too close in color for my taste; my flower needed to be a darker pink for a bit more contrast. All the products used are CTMH ( green argyle pp is from Sweet Harmony, the pink is from Sugar and Spice) Nothing really to report on this card, it is self explanatory, simple, fast and easy. I just sponged Sweet Leaf ink on to the chipboard.


This next one, my Sending Warm Wishes card, was something I pictured in my mind as soon as I saw the bird nest stamp. I knew I was going to use a cloud and sun, and knew exactly how I wanted it to be. It came out pretty much how I wanted it. I used a lot of Copics (I will list the marker numbers below w/ the supply list), and lots of stickles and glitter. This card was not fast because of the cutting and the coloring, but it was easy & fun...and I just love it. Even though we got a little snow overnight, it makes me feel like spring is in the air, and the sun is shining.


* Remember, as always, you can click on the pictures and see them bigger and all the detail.


You cant tell in these (lousy) pictures, but everything is foam dotted up, so there is tons of dimension. The mushrooms have so many layers and look so good, but I didnt get a close up of it. I thought it would show up. *sigh* And when I finally downloaded them, I was out of daylight. (w/out daylight, my photos are even worse)


Okay, the grass, I used the icicles punch by Martha Stewart! Someone else probably already had that idea, and it may not be new to you, but I've never seen it done before and I felt pretty fancy & brilliant with my a-ha moment to use it upside down. (so dont burst my bubble if it's already been done--he he) And it used a long skinny SCRAP of green paper that I pulled from my trash can at my desk...BONUS! ( which I sponged on more green ink for texture, and to cover the argyle diamonds, since the green paper strip was from sweet harmony paper pack)

I used small pieces of white scrap CS to stamp the branch and bird nest and mushrooms. I colored them in with copic markers, cut them out and popped them up on foam.

Supplies ( all ctmh except the Copics and Stickles--love, LOVE my Stickles!):

I already talked about the grass...moving on...

Blue PP is from TopStitch paper pack
White Daisy CS (scraps)
Stamps:
Branch/Birds: Love You Forever; Cloud: Childhood; Sentiment: TLC

Copics: birds: Booo, B21, R20; Flower: R20, R83, y21; Leaves: YG11, G24, G28; Mushrooms, well, suffice it to say I used LOTS of colors. :o) Branch: E34, E37, E47; Nest: E33, E34, E37, E47

And plenty o'Stickles.


And lastly, a Tri-Fold card using...wait for it...BIRDS... again. I love them. This card didnt turn out as I saw it in my mind, but I know what I dont like and how I would make it better next time to get it the way I had first envisioned it. (I'll probably re-make it over the weekend, but I wont waste your time posting it.)


This is the inside. Sorry about the lousy pictures, I was out of light and using my desk lamp...nice glaring shadows. Oh well. You get the idea.
I used a Sharpie Gold paint pen and a ruler and framed everything in gold. The Somebirdy Loves you Stamps ( can you tell I love it too?) is heat embossed with gold powder.
Choc. CS, Veranda PP's. Copics to color in the stamped image are the same colors as above, except the nest , which I used: E00 and E33
I added the heart which I colored in with R20
No stickles or glitter. Just the gold for sparkle. Kinda sad about that. But it just didnt have a glitter vibe...and that is a rare thing in my world.
Okay, that's it for today.
I hope you have a wonderful and safe weekend.
~Cheryl

Sunday, December 20, 2009

Snow Day Playtime!


Hi there, and Happy Snowed-In Day!! ( thank God my Christmas shopping is done...whew!) Here in the mid-Atlantic Region we are getting an awesome snowstorm, more than a foot of snow today... it looks lovely out there. Perfect for holiday crafting, yes? Yes!
So here are a few of the things I created today. ( due to the blizzard, there is NO natural light to help a girl out in the photog arena. So I apologize for the off-color-balance and low light)
*Dont forget, you can always click on the photo's and see them close up and the details.
This first Birdy card is SIMPLE and FAST:


Products used are all CTMH:
Stamps:
"string"- Holiday Trinkets
branch/leaves- Twitterpated WOTG/hedgehog set
cage/sentiment/bird/heart-Love Birds
inks: cocoa, black, ocean
PP-Veranda
CS- garden greeen, textured CS Ocean ( the backside/lighter side)
Next up, my Cozy Winter Anya card:


Products used:
CTMH White Daisy Cardstock, and Heavenly Blue CS ( run thru the Cuttlebug, snowflakes folder and sanded to show the white core of the CS).
Copics
Prizma Glitter and Fun Flock ( on furry muffs and trim)
White Organza ribbon
snowflake punches and more glitter and a rhinstone
Stamp: Anya from The Greeting Farm
Even though she is simple & unmatted, I just love her and the simplicity of this card. I was going to mat her in pink, to match her scarf, but it looked too busy. I tried a few other things, but with the snowlfake tx background, it all looked too busy. So I just left her simple.
If you have any questions, just shoot me a comment and I'll respond.
Happy Snowday!
Cheryl

Tuesday, December 15, 2009

It's Beginning to Look a Lot Like Christmas...


Hi Friends!

I am SO sorry I have been away so very long. H1N1 went through my house, and then it was Thanksgiving, and then I had to take down fall decor, and decorate (and shop) for Christmas (which we are having here this year)...and so my story goes. But I am back baby!


Over the weekend I put the finishing touches on the tree(s) and the entire house, inside and out, is DONE. Most of the shopping...DONE! ( key word: most) Have I sent cards yet? Nope. Have I wrapped anything? Nada. Zip. Zilch. Still plenty o' time, right?

BUT, the good part is our home is a winter wonderland, sparkling with twinkle lights aplenty, and glittered within an inch of its life. ( I will take some photos and post in the next days or so). I really, REALLY love LOVE me some Christmastime! I think I may actually be a magpie...anything sparkles and I am all over it.


Speaking of glitter and yummy sparkliness: I finally, for the first time in over a month, got to play in my studio and create!! I didnt do as much as I wanted to...I had planned to do a 2 page LO using the new Rockstar papers, but when it came to sitting down to create, I really just wanted to put Christmas music on and play in the glitter. So, I made a few holiday cards instead.

(I'll get to the Rockstar pages this weekend and post.)


So, for my Mother In Law I made this swanky cocktail Holiday Cheers! card... it goes along with some of the gifts we bought her. I used all CTMH products (except the cocktail stamp, which I colored in with Copics); ctmh Jingle Papers and cardstock; the snowflakes are made using punches (mainly MS punches) on ctmh white cardstock; the sentiment is from Ms. Holiday stamp set. The red and silver glitter is from the retired glitter stack, but any fine red/silver glitter will work. The rest of the glitter is Prisma.


My Party Animal/Happy New Years Card is bright, festive and fun...oh, and sparkling, natch! The martini and sentiment stamp is from 'our craft lounge' (everything is colored in with copics)...everything else is ctmh, except the mad amounts of Stickles I used. The paper is ctmh Whoops A Daisy, and ctmh cardstock hydrangea, ocean and textured cardstock in Citrus Leaf. CTMH stamps used: Merry Monsters, Spot On Backgrounds, and Please Join Us. ( the icicles border punch is by MS and the google eyes are from craft store). Cheers! ( hmmm...seems I had a cocktail theme going for a bit there)


Lastly, I wanted to make a winter street scene with the houses from the Neighborhood Stampset by CTMH. This is what I came up with.


Products List:

Patterened paper: ctmh Aspen

Cardstock: (ctmh white daisy)

Stamps: (all ctmh) Festive Thoughts ( for the sentiment, which is heat embossed in Silver, but you cant tell that in these horrid pictures, sorry); most of the trees are from The Beauty Of Christmas; and then, yes, Neighborhood. The houses, the bit of fence, the lamposts and the car are all from the 'Hood.

I paperpieced a bit, foam-squared, and prisma'd my heart out. The car tires are stamped in black, black embossed and cut out. The wreaths, they were a bit of a pain. The scale of the houses/doors were so darn tiny...so my wreaths had to be tiny. So, I used a tiny hole punch for the middles ( on green cardstock) and regular sized hole punch around the little hole, viola wreath(s)! The tree on the car I just free cut out a triangle from green cardstock, and a little trunk. The same with the tree on the townhouse. It was a bush on the stamp, but I wanted a conical holiday tree shape, so I just free-hand cut one out.


As always, you can click on the photos and see it bigger/in more detail. And, feel free to ask any questions you may have, I promise to get back to you.


Happy Holidays!

~Cheryl


Monday, October 26, 2009

Happy Manic Monday!

I started lots of projects today, but I only actually finished one measly little card. Real life and chores stand in the way of my progress. Best laid plans... sigh.

Anyway, here's my little Slimy Monster card. He was very simple ( which is why I actually finished him). I don't think you need a supply list or any instructions...he is self-explanatory and basic cardstock. ( all ctmh except the googly eye and pom ribbon...both from craft store. The stamp set is Merry Monsters)


Here's the start of a cute little surfer dude...I am going to put him on a scrap layout from our summer surfing down in the Carolina's. I colored him with Copics. The cardstock is CTMH and the stamp is from CC Designs. I promise to post the Layout when it is finished.

Tomorrow I should be done with a large holiday project using Jingle papers and has a vintage vibe. And LOTS of glitter.
I would love if anyone can share some artwork photog/lighting and downloading tips, and any other suggestions. I'm technically challenged.
Thanks for stopping by!
~Cheryl

Sunday, October 25, 2009

This weekend's artwork


The Original Fangster Yo!

My little vamp fangster was originally going to be a card, but them I remembered I needed a festive gift bag to give my in-laws some Halloween treats. They are so sweet to us , they really deserve a tricked-out swag bag...so this is what I came up with.

Supplies used:
Stamp(s):CTMH ( Little Spooks set)
Cardstock: CTMH ( cranberry, sunflower, orange)
Patterned Paper: CTMH ( star paper from Game On pack); Making Memories
Inks: CTMH ( black , orange)
Other: black and orange Stickles, Copic markers, computer font for text


This Happy Haunting card uses all CTMH products with LOTS of sponge inking and torn sticky notes for masking.

Supplies used:
Stamp(s):CTMH ( The Beauty of Christmas-trees , Spellbound
Cardstock: CTMH ( aut.umn terracotta, black, white daisy)
Patterned Paper: (none used)
Inks: CTMH ( black , sunflower, honey, orange, aut. terr., chocolate, desert sand)
Other: corner punch, black glitter, sticky notes


This spooky tree card also uses the Spellbound stamp set and LOTS of sponging/inky fingers. The ground/horizon line is masked using ripped sticky notes and brayers black on the ground side and sponged in blues and black on the sky side. I also used a white paint pen for highlights and the stars.


Ooh la la!


Isn't mon cherie tres adorable, yes? She is colored w/ copics, and I colored a second set of legs and cut them out and foam pop-dotted them, so she is 3-D. I love layering, paperpiecing and adding textures and layers. I used CTMH Pear Paint ( brushed on w/ a foam brush) on the butterfly to give it shimmer and hold its shape. Overall, I think she turned out romantic and sweet.

Supplies used:
Stamp(s):various--Gorguss Girl; Eiffel tower (SU!)
Cardstock: CTMH ( amethyst, black, white daisy, key lime)
Patterned Paper: Websters
Other: CTMH ( ribbon, pearl paint); Copics ( colors shown below); Stickles


Jingle-Bread Land

I LOVE this yummy new paper pack by CTMH called Jingle...you are sure to see so much more of it this week, heck the next couple months! I also really adore the CTMH November Stamp Of The Month ( SOTM), Around The Block,
Another CTMH consultant ( shout out Karen P) had the brilliant idea to use this cute house stamp set to make a gingerbread house. Well, that got my creative juices flowing and I decided to try and make a little gingerbread scene. ( next I will make a village! tho, it will likely be a scrap page or something larger) This is just a quick & dirty experiment, so please excuse the sloppy heat embossing ( white daisy embossing powder).
I just hand drew the gingerbread man and little candy cane and cut them out. The tree is also just a hand drawn triangle cut out of a sheet of (Chistmas) music, then inked and glittered ( natch).
All products are CTMH except the stickles and sheet music paper.


Firefly and Crazy Frog

I made this firefly card for my girlfriend who gave us a bottle of Firefly Sweet Tea Vodka...sooo yummy. A perfect summer cocktail. Anyway, it is all CTMH products with the usual brayering and sponging and glittering. Again, skyline masked with a sticky note.


The silly frog uses the same technique and is all ctmh except the frog stamp, which is by Whimsy stamps.

Go Phillies!!! ( I need to make some Phillies cars and scrap pages soon!)